こんにちは、デザイナーのサリーです。
最近買った漫画は「ウメハラ – To live is to game -」です。
さて、王くんのおかげで Sass + Compass を使えるようになりました。わーい!
王くんのブラボーな記事はこちら↓
CSSの常識が変わる!「Compass」、基礎から応用まで!
Sassファイルの吐き出したCSSファイルの出力スタイルの設定は「config.rb」を書き換えることで簡単に変更出来ました。
今回はconfig.rbの基本的な編集方法についてまとめてみました。
config.rb のデフォルトの記述
config.rbの中身は何もいじらないとこんな感じになっていると思います。
(Codekitなどで吐き出すとCodekitのデフォルトの設定が入るので、またちょっと違います)
# Require any additional compass plugins here.

# Set this to the root of your project when deployed:
http_path = "/"
css_dir = "stylesheets"
sass_dir = "sass"
images_dir = "images"
javascripts_dir = "javascripts"

# You can select your preferred output style here (can be overridden via the command line):
# output_style = :expanded or :nested or :compact or :compressed

# To enable relative paths to assets via compass helper functions. Uncomment:
# relative_assets = true

# To disable debugging comments that display the original location of your selectors. Uncomment:
# line_comments = false

# If you prefer the indented syntax, you might want to regenerate this
# project again passing --syntax sass, or you can uncomment this:
# preferred_syntax = :sass
# and then run:
# sass-convert -R --from scss --to sass sass scss && rm -rf sass && mv scss sass
親切にコメントを書いてくれているので分かりやすいのですが、上から順番に解説してみます。
Compassのプラグインを追加
1行目
# Require any additional compass plugins here.これは「コンパスのプラグインを追加するならここに書いてね」ということですね。
Compassのプラグインは公式サイトにもいろいろ載っています。
Plugins and frameworks | Compass Documentation
以下のようにしてプラグインを呼び出します。
# Require any additional compass plugins here.
require 'ninesixty'
require 'susy'
各ディレクトリ名の設定
3〜8行目
# Set this to the root of your project when deployed:
http_path = "/"
css_dir = "stylesheets"
sass_dir = "sass"
images_dir = "images"
javascripts_dir = "javascripts"
これはそのまま、吐き出すcssファイルやjsファイルなどのディレクトリ名の設定です。
環境に合わせて適宜変更しましょう。
# Set this to the root of your project when deployed:
http_path = "/"
css_dir = "css"
sass_dir = "sass"
images_dir = "images"
javascripts_dir = "js"
CSSの出力スタイルを設定
10、11行目
# You can select your preferred output style here (can be overridden via the command line):
# output_style = :expanded or :nested or :compact or :compressed
ここでは吐き出すCSSのスタイルを設定出来ます。
expanded、nested、compact、compressed の4パターン用意されていて、それぞれのスタイルは以下の通りです。
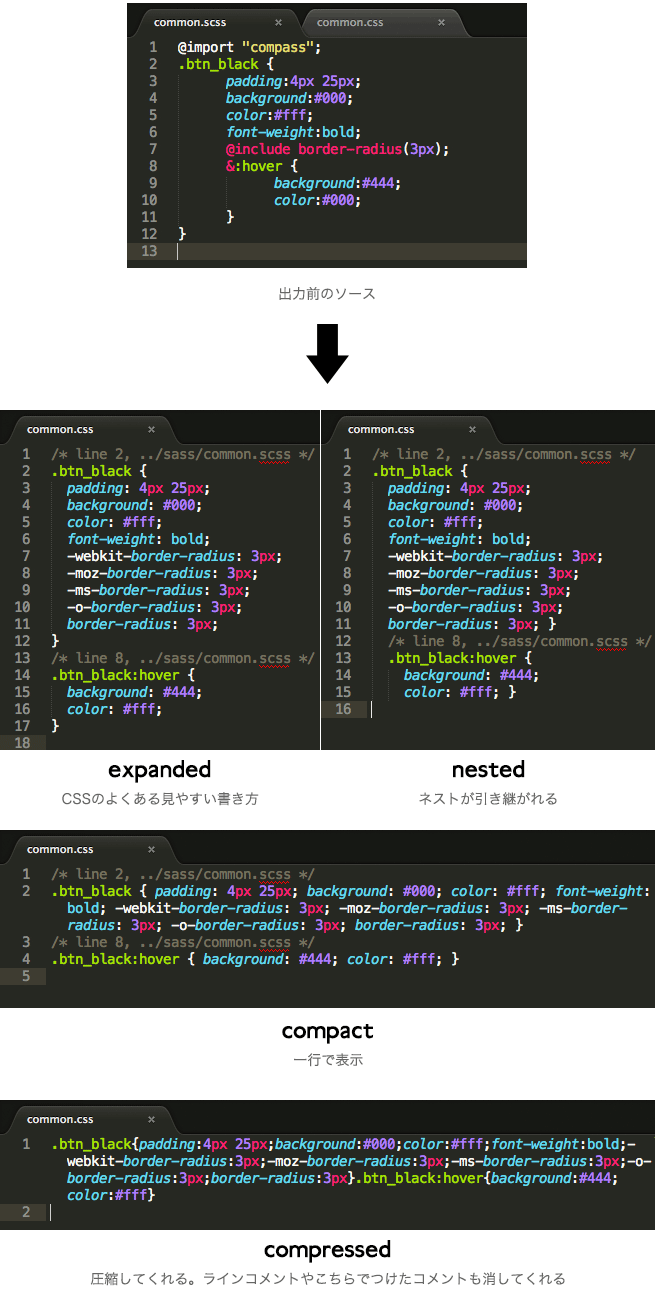
開発中は読みやすい「expanded」、納品時は圧縮してくれる「compressed」がおすすめです。
インデントは半角スペース2つ分ですが、こちらを変更するのは結構ややこしそうでした。
Sassで出力するCSSファイルを自社のCSS記述ルールに合わせるヒント|Blog|Skyward Design※現在はサービスを終了しています。
例えば「expanded」で吐き出したいときは以下のようにします。
# You can select your preferred output style here (can be overridden via the command line):
output_style = :expanded
パスの指定方法を設定
13、14行目
# To enable relative paths to assets via compass helper functions. Uncomment:
# relative_assets = true
CompassではデフォルトのURL指定が絶対パスになっています。
スプライト生成機能を使用する際など、相対パスを使いたい場合は以下の通りにします。
# To enable relative paths to assets via compass helper functions. Uncomment:
relative_assets = true
CSSファイルにlineコメントをつける
16、17行目
# To disable debugging comments that display the original location of your selectors. Uncomment:
# line_comments = false
CSSファイルにコメントを残すかどうかの設定です。
コメントありにすると、CSSファイルを参照したとき、どのSassファイルの何行目の記述か分かるようになります。

デフォルトではコメントがついているので、消したい場合は以下のようにします。
# To disable debugging comments that display the original location of your selectors. Uncomment:
line_comments = false
Codekitで吐き出すと、この下に「color_output = false」という一文が追加されています。何の設定かとググってみてもあまり情報が出てこなかったのですが、どうやらターミナルの文字に色をつけるというなんとも微妙なオプションらしい。。。
Sassの記述方法を切り替える
20〜24行目
# If you prefer the indented syntax, you might want to regenerate this
# project again passing --syntax sass, or you can uncomment this:
# preferred_syntax = :sass
# and then run:
# sass-convert -R --from scss --to sass sass scss && rm -rf sass && mv scss sass
SassにはSCSSとSASS、二種類の記述法がありますが、どちらを使うかを設定することが出来ます。
一般的にはSCSSが使われているので、デフォルトでもSCSSになっています。
SASSで書きたいときは以下のようにします。
# If you prefer the indented syntax, you might want to regenerate this
# project again passing --syntax sass, or you can uncomment this:
preferred_syntax = :sass
# and then run:
# sass-convert -R --from scss --to sass sass scss && rm -rf sass && mv scss sass
また、24行目にある「sass-convert…」は、ファイルをSCSSからSASSへ変換するコマンドです(逆も可能)。
ターミナル(Mac)やコマンドプロンプト(Win)で実行します。
まとめ
普段使うように編集して以下のようになりました。
# Require any additional compass plugins here.

# Set this to the root of your project when deployed:
http_path = "/"
css_dir = "css"
sass_dir = "sass"
images_dir = "images"
javascripts_dir = "js"

output_style = :expanded

# To enable relative paths to assets via compass helper functions. Uncomment:
relative_assets = true

# To disable debugging comments that display the original location of your selectors. Uncomment:
# line_comments = false

# If you prefer the indented syntax, you might want to regenerate this
# project again passing --syntax sass, or you can uncomment this:
# preferred_syntax = :scss
# and then run:
# sass-convert -R --from scss --to sass sass scss && rm -rf sass && mv scss sass
最終的にoutput_styleを「compressed」に変えれば、line_commentsはtureのままでもコメントを勝手に削除してくれます。
ついでに注釈のコメントを取ってすっきりさせてみます。
http_path = "/"
css_dir = "css"
sass_dir = "sass"
images_dir = "images"
javascripts_dir = "js"
output_style = :expanded
relative_assets = true
基本の設定だけ紹介しましたが、他にもテストと本番で設定を変えたりと、いろいろと出来るみたいです。
よかったら調べてみてください!
LIGはWebサイト制作を支援しています。ご興味のある方は事業ぺージをぜひご覧ください。