こんにちは、くりちゃんです。
LIGではフロントエンドエンジニアとして、グラフィカルなWebサイトの実装を担当することや、デザイナーさんから通常のWebサイトにはない、特殊な実装を依頼されることが多いです!
つい先日担当させていただいた「けたくま」オフィシャルサイトの実装では、ある箇所をクリックしたら700以上の画像が上から降ってくるような変わった実装をしました。こういった実装はhtmlとcssでは、パフォーマンスや実装コストを考えるとカバーしきれません。

- 「けたくま」オフィシャルサイト
- https://ketakuma.com
そのためcanvasタグでcanvas2DやWebGLを使用して実装していますが、WebGLは高度な専門知識が求められ、WebGLのみで3DCGを表現するのは難しいので、いつもThreejsなどのライブラリを使っています。
今回はThreejsのユーティリティクラスを使って、3Dのモーフィングアニメーションを実装したいと思います。
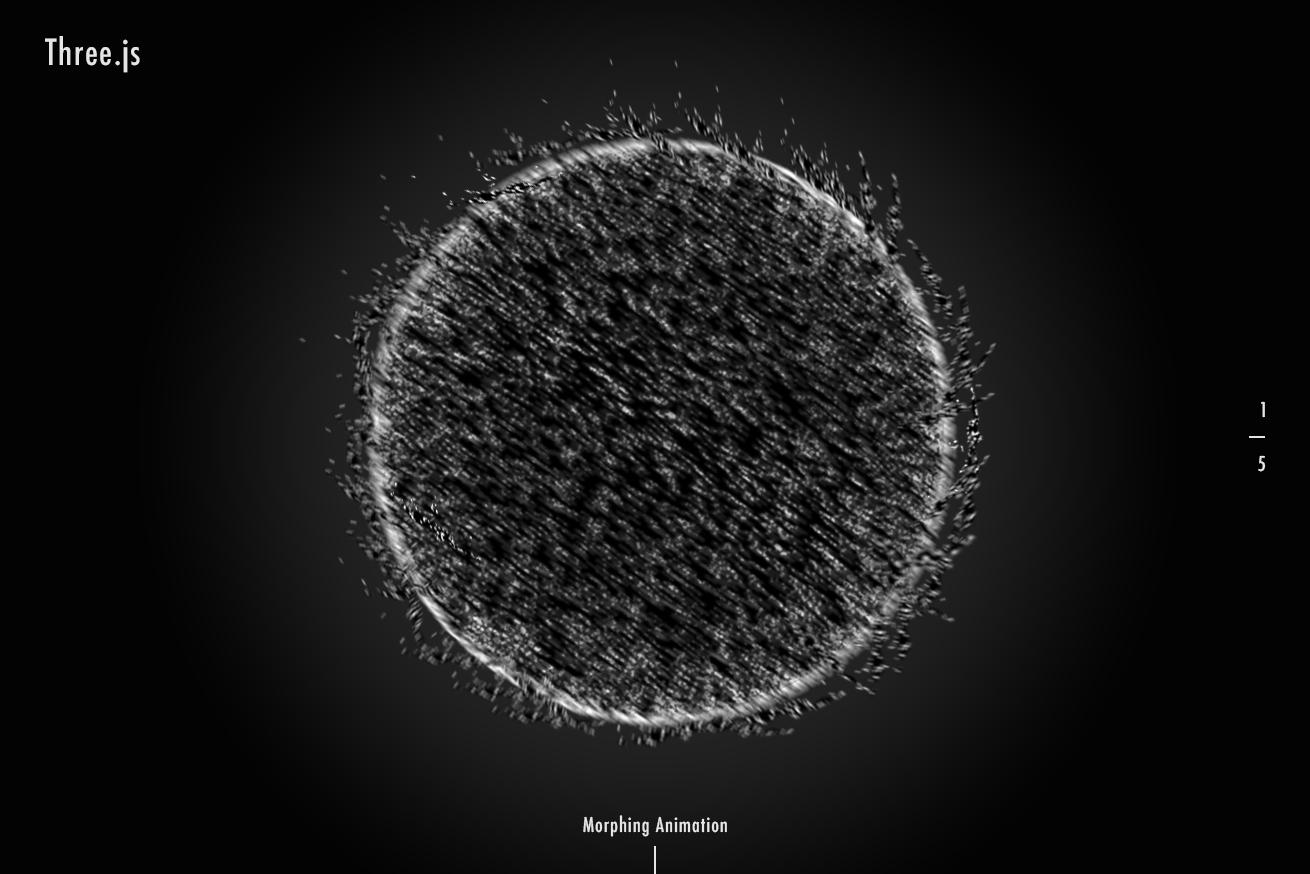
完成形
早速ですが、今回作成したものがこちらです! スクロールしていくとさまざまな形に変化していきます。
See the Pen
Threejs Points Mofing by Hisami Kurita (@hisamikurita)
on CodePen.
これを実装しようと思ったきっかけは、Threejsには、メッシュの表面上にランダムに頂点を付与することができる、ユーティリティクラスがあることを知ったことからでした。こちらから確認できます。
このユーティリティクラスと、glslのmix関数を使用して、線形補完させればモーフィングのような動きになるのではないかと思い、作ってみました。
Step1 ステージを用意
物体(メッシュ)を置くためにステージ(シーン)を用意します。
class Stage {
  constructor() {
    this.renderParam = {
      clearColor: 0x000000,
      width: window.innerWidth,
      height: window.innerHeight
    };
    this.cameraParam = {
      fov: 45,
      near: 0.1,
      far: 100,
      lookAt: new THREE.Vector3(0, 0, 0),
      x: 0,
      y: 0.5,
      z: 4
    };

    this.scene = null;
    this.camera = null;
    this.renderer = null;
    this.isInitialized = false;
    // this.orbitcontrols = null;
  }

  init() {
    this._setScene();
    this._setRender();
    this._setCamera();
    this.isInitialized = true;
  }

  _setScene() {
    this.scene = new THREE.Scene();
    // this.scene.add(new THREE.GridHelper(1000, 100));
    // this.scene.add(new THREE.AxesHelper(100));
  }

  _setRender() {
    this.renderer = new THREE.WebGLRenderer();
    this.renderer.setPixelRatio(window.devicePixelRatio);
    this.renderer.setClearColor(new THREE.Color(this.renderParam.clearColor));
    this.renderer.setSize(this.renderParam.width, this.renderParam.height);
    const wrapper = document.querySelector("#webgl");
    wrapper.appendChild(this.renderer.domElement);
  }

  _setCamera() {
    if (!this.isInitialized) {
      this.camera = new THREE.PerspectiveCamera(
        0,
        0,
        this.cameraParam.near,
        this.cameraParam.far
      );

      this.camera.position.set(
        this.cameraParam.x,
        this.cameraParam.y,
        this.cameraParam.z
      );
      this.camera.lookAt(this.cameraParam.lookAt);

      // this.orbitcontrols = new THREE.OrbitControls(
      //     this.camera,
      //     this.renderer.domElement
      // );
      // this.orbitcontrols.enableDamping = true;
    }

    const windowWidth = window.innerWidth;
    const windowHeight = window.innerHeight;
    this.camera.aspect = windowWidth / windowHeight;
    this.camera.fov = this.cameraParam.fov;

    this.camera.updateProjectionMatrix();
    this.renderer.setSize(windowWidth, windowHeight);
  }

  _render() {
    this.renderer.render(this.scene, this.camera);
    // this.orbitcontrols.update();
  }

  onResize() {
    this._setCamera();
  }

  onRaf() {
    this._render();
  }
}
ここでもしかしたら「コードが長い!」と思った方もいるかも知れません。ThreejsはWebGLを簡単に扱えるようにしているのですが、それでも使うにはお作法的な準備が多いです。
余談ですが、開発中はorbitcontrolsやThreejsのヘルパー関数(GridHelper/AxesHelper)を使用してデバッグをすることが多いです。ここではコメントアウトしています。
Step2 メッシュを作成
次に物体を作っていきます。
class Mesh {
  constructor(stage) {
    this.rotationPower = 0.01;
    this.stage = stage;
  }

  init() {
    this._setMesh();
    this._setScroll();
  }

  _getGeometryPosition(geometry) {
    const numParticles = 10000;
    const material = new THREE.MeshBasicMaterial();
    const mesh = new THREE.Mesh(geometry, material);
    const sampler = new MeshSurfaceSampler(mesh).build();
    const particlesPosition = new Float32Array(numParticles * 3);
    for (let i = 0; i < numParticles; i++) {
      const newPosition = new THREE.Vector3();
      const normal = new THREE.Vector3();

      sampler.sample(newPosition, normal);
      particlesPosition.set([newPosition.x, newPosition.y, newPosition.z], i * 3);
    }

    return particlesPosition;
  }

  _setMesh() {
    const geometry = new THREE.BufferGeometry();
    const firstPos = this._getGeometryPosition(
      new THREE.SphereBufferGeometry(1, 32, 32).toNonIndexed()
    );
    const secPos = this._getGeometryPosition(
      new THREE.TorusBufferGeometry(0.7, 0.3, 32, 32).toNonIndexed()
    );
    const thirdPos = this._getGeometryPosition(
      new THREE.TorusKnotBufferGeometry(0.6, 0.25, 300, 20, 6, 10).toNonIndexed()
    );
    const forthPos = this._getGeometryPosition(
      new THREE.CylinderBufferGeometry(1, 1, 1, 32, 32).toNonIndexed()
    );
    const fivePos = this._getGeometryPosition(
      new THREE.IcosahedronBufferGeometry(1.1, 0).toNonIndexed()
    );
    const material = new THREE.RawShaderMaterial({
      vertexShader: document.querySelector("#js-vertex-shader").textContent,
      fragmentShader: document.querySelector("#js-fragment-shader").textContent,
      uniforms: {
        u_sec1: { type: "f", value: 0.0 },
        u_sec2: { type: "f", value: 0.0 },
        u_sec3: { type: "f", value: 0.0 },
        u_sec4: { type: "f", value: 0.0 }
      },
      transparent: true,
      blending: THREE.AdditiveBlending,
    });

    geometry.setAttribute("position", new THREE.BufferAttribute(firstPos, 3));
    geometry.setAttribute("secPosition", new THREE.BufferAttribute(secPos, 3));
    geometry.setAttribute("thirdPosition", new THREE.BufferAttribute(thirdPos, 3));
    geometry.setAttribute("forthPosition", new THREE.BufferAttribute(forthPos, 3));
    geometry.setAttribute("fivePosition", new THREE.BufferAttribute(fivePos, 3));

    this.mesh = new THREE.Points(geometry, material);

    this.group = new THREE.Group();
    this.group.add(this.mesh);

    this.stage.scene.add(this.group);
  }

  _setScroll() {
    gsap.timeline({
        defaults: {},
        scrollTrigger: {
          trigger: "body",
          start: "top top",
          end: "bottom bottom",
          scrub: 0.7
        }
      })
      .to(this.mesh.rotation, {
        x: Math.PI * 2,
        y: Math.PI * 2,
        z: Math.PI * 2
      });

    gsap.to(this.mesh.material.uniforms.u_sec1, {
      value: 1.0,
      scrollTrigger: {
        trigger: ".s-1",
        start: "bottom bottom",
        end: "bottom top",
        scrub: 0.7
      }
    });
    gsap.to(this.mesh.material.uniforms.u_sec2, {
      value: 1.0,
      scrollTrigger: {
        trigger: ".s-2",
        start: "bottom bottom",
        end: "bottom top",
        scrub: 0.7
      }
    });
    gsap.to(this.mesh.material.uniforms.u_sec3, {
      value: 1.0,
      scrollTrigger: {
        trigger: ".s-3",
        start: "bottom bottom",
        end: "bottom top",
        scrub: 0.7
      }
    });
    gsap.to(this.mesh.material.uniforms.u_sec4, {
      value: 1.0,
      scrollTrigger: {
        trigger: ".s-4",
        start: "bottom bottom",
        end: "bottom top",
        scrub: 0.7
      }
    });
  }

  _render() {
    this.group.rotation.x += this.rotationPower;
    this.group.rotation.y += this.rotationPower;
  }

  onResize() {
    //
  }

  onRaf() {
    this._render();
  }
}
RawShaderMaterialを使ってシェーダーを記述していくのですが、シェーダーで計算させるために、変化させたい形のそれぞれの位置情報を送る必要があります。
その位置情報を設定しているのが、_getGeometryPosition()です。引数にgeometryを渡すとそのgeometryに対してランダムに頂点を付与して、positionを返します。
_getGeometryPosition(geometry) {
	const numParticles = 10000;
	const material = new THREE.MeshBasicMaterial();
	const mesh = new THREE.Mesh(geometry, material);
	const sampler = new MeshSurfaceSampler(mesh).build();
	const particlesPosition = new Float32Array(numParticles * 3);
	for (let i = 0; i < numParticles; i++) {
	const newPosition = new THREE.Vector3();
	const normal = new THREE.Vector3();

	sampler.sample(newPosition, normal);
	particlesPosition.set([newPosition.x, newPosition.y, newPosition.z], i * 3);
	}

	return particlesPosition;
}
ここで先述したMeshSurfaceSamplerというユーティリティクラスを使用し、buildメソッドで頂点を付与するための準備をしたうえで、sampleメソッドでジオメトリの表面上にランダムな点を付与します。
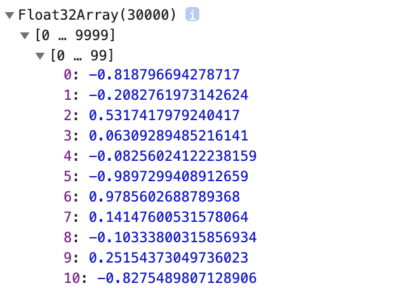
ちなみにparticlesPosition中身は、3万個の頂点情報が入った型付き配列になっています。
この頂点情報をジオメトリーに付与したら、下準備は完了です。
geometry.setAttribute("position", new THREE.BufferAttribute(firstPos, 3));
geometry.setAttribute("secPosition", new THREE.BufferAttribute(secPos, 3));
geometry.setAttribute("thirdPosition", new THREE.BufferAttribute(thirdPos, 3));
geometry.setAttribute("forthPosition", new THREE.BufferAttribute(forthPos, 3));
geometry.setAttribute("fivePosition", new THREE.BufferAttribute(fivePos, 3));
シェーダーで計算させる
下準備が完了したら、シェーダーの力を使って1万個の頂点を一気に計算させていきます。
attribute vec3 position;
attribute vec3 secPosition;
attribute vec3 thirdPosition;
attribute vec3 forthPosition;
attribute vec3 fivePosition;
uniform float u_sec1;
uniform float u_sec2;
uniform float u_sec3;
uniform float u_sec4;
uniform mat4 modelViewMatrix;
uniform mat4 projectionMatrix;

void main() {
 vec3 toTorus = mix(position, secPosition, u_sec1);
 vec3 toTorusKnot = mix(toTorus, thirdPosition, u_sec2);
 vec3 toCylinder = mix(toTorusKnot, forthPosition, u_sec3);
 vec3 finalPos = mix(toCylinder, fivePosition, u_sec4);

 gl_Position = projectionMatrix * modelViewMatrix * vec4(finalPos, 1.0 );
 gl_PointSize = 3.0;
}glslにはmix関数という線形補完をしてくれる便利な関数が既に用意されているので、そちらを使用しています。この線形補完の割合の値はuniform変数をシェーダーに送っていて、この値はgsapのscrollTriggerを使用して、スクロール値に連動して0~1の範囲で値が変化します。
gsap.to(this.mesh.material.uniforms.u_sec1, {
      value: 1.0,
      scrollTrigger: {
        trigger: ".s-1",
        start: "bottom bottom",
        end: "bottom top",
        scrub: 0.7
      }
    });
    gsap.to(this.mesh.material.uniforms.u_sec2, {
      value: 1.0,
      scrollTrigger: {
        trigger: ".s-2",
        start: "bottom bottom",
        end: "bottom top",
        scrub: 0.7
      }
    });
    gsap.to(this.mesh.material.uniforms.u_sec3, {
      value: 1.0,
      scrollTrigger: {
        trigger: ".s-3",
        start: "bottom bottom",
        end: "bottom top",
        scrub: 0.7
      }
    });
    gsap.to(this.mesh.material.uniforms.u_sec4, {
      value: 1.0,
      scrollTrigger: {
        trigger: ".s-4",
        start: "bottom bottom",
        end: "bottom top",
        scrub: 0.7
      }
    });
最後に、作成したステージとメッシュを呼び出せば完成です!
(() => {
  const stage = new Stage();
  stage.init();

  const mesh = new Mesh(stage);
  mesh.init();

  window.addEventListener("resize", () => {
    stage.onResize();
    mesh.onResize();
  });

  const _raf = () => {
    window.requestAnimationFrame(() => {
      stage.onRaf();
      mesh.onRaf();

      _raf();
    });
  };

  _raf();
})();
終わりに
いかがでしたしょうか! 難しい計算部分はライブラリに頼っているので、そこまで難しくはなかったと思います。このユーティリティクラスを使用すれば3Dモデルを基にパーティクルを作成することも可能なので、一気にWebの表現が広がるのではないでしょうか。
また、ここからは余談ですが、先日のオリンピック開会式でのドローンを使用した演出はすごかったですよね。無数の点がいろいろな形に変わっていくだけですが、やはりこういった演出はとても惹きつけられるものがあるなと思いました!
上記のモーフィングアニメーションもただの白い点が動くだけですが、色付けや、頂点の動きを工夫すればもっと多くの人を惹きつけられる作品に昇華できる可能性があります。
こちらのデモは上記のモーフィングアニメーションを基に作ってみました。
See the Pen
Threejs Particle Mofing #05 by Hisami Kurita (@hisamikurita)
on CodePen.
次回はもう一段階クオリティをアップするパーティクルアニメーションの作り方を紹介できれば良いなと思います!
これからも見た人がワクワクするようなWeb表現を追求していきたいですね。終わり。
LIGはWebサイト制作を支援しています。ご興味のある方は事業ぺージをぜひご覧ください。