Technology部のJoshです。
当記事では「画像分析チャットアプリケーション」の構築を通じて、LangChainのカスタムツールの定義や画像分析モデル(年齢や感情)の使い方を解説します。
生成AIを学んでいるみなさんの参考となれば幸いです。
目次
LangChainとは
LangChainは、大規模言語モデル(LLM)を扱うための強力なフレームワークです。
詳細は以下の記事をご覧ください。 LangChain×Streamlitを使ったチャットボットアプリを開発してみた
LangChainは以下のコンポーネントで構成されます。
モデル(LLMラッパー):これにより、GPTやGoogleのBERTなど、異なる大規模言語モデルを組み合わせて使用することを実現します。
プロンプト:モデルへの入力を指します。この入力は通常ハードコーディングされず、複数のコンポーネントから構築されます。LangChainのPromptTemplateはこの入力の構築を助け、LangChainはプロンプトの構築と操作を簡単にするためのいくつかのクラスと関数を提供します。
チェーン:あらかじめ決定された手順のシーケンスであり、より多くの制御を提供し、理解を深めるのに役立ちます。具体的には、LangChainのチェーン機能を用いるとAIが生成した回答を次のプロンプトに含めて入力できます。これにより、一連の対話を通じてより複雑なタスクを実行したり、より詳細な情報を取得したりすることが可能になります。
ツール:言語モデルが簡単に対話することを可能にします。ツールのインターフェースには、単一のテキスト入力と単一のテキスト出力があります。これにより、言語モデルは特定のタスクを実行するための指示を受け取り、その結果を出力できます。これは、言語モデルがより具体的なタスクを効率的に実行するための枠組みを提供します。
エージェント:意思決定をおこなう言語モデルです。具体的には、エージェントは複数のツールを組み合わせて、必要な処理を実行する機能を持っています。たとえば、情報収集を行うための検索エンジンと、グラフを作成するためのPythonコードなどを組み合わせて活用できます。
ベクトルストア:LangChainのカスタムデータを組み込む場所です。これらの機能を用いると、大量のデータを効率的に管理し、必要な情報をすばやく取得することが可能になります。これは、言語モデルが大量のデータから特定の情報を抽出する際に特に有用です。
チャットアプリの構築手順
アプリケーション仕様
今回開発するアプリケーション仕様は以下のとおりです。
| Host | ローカルホスト(MacOS Ventura 13.4.1) |
|---|---|
| プログラミング言語 | Python(ver3.10) |
| 仕様 | Postした画像に対して、分析と対話が可能なチャットボットアプリケーション |
ライブラリ
今回のサンプルアプリでは、LangChainとOpenCVなどの画像認識AIモデルのライブラリを使用します。さらにフロントエンドについては、Streamlitを使ってチャットアプリのUIを実現します。
実際のライブラリインストール手順は以下のとおりです。
Terminal
pip install streamlit streamlit-chat langchain transformers Pillow torch deepface opencv-python
実装したコードは私のGitHubで確認できますが、一つひとつの処理について解説していきます。
※解説対象のコードはこちら
1.ライブラリのインポート
まずはプログラムの冒頭において必要なパッケージをインポートします。
```Python
import os
import streamlit as st
from streamlit_chat import message
from langchain.chat_models import ChatOpenAI
import tempfile
from langchain.tools import BaseTool
from transformers import BlipProcessor, BlipForConditionalGeneration, DetrImageProcessor, DetrForObjectDetection
from PIL import Image
import torch
from langchain.agents import initialize_agent
from langchain.chains.conversation.memory import ConversationBufferWindowMemory
from deepface import DeepFace
import cv2 as cv
import time
```
インポートするパッケージの詳細は以下のとおりです。
Streamlit:Webアプリケーションを構築するためのPythonライブラリです。データの可視化、ダッシュボードの構築、チャットボットの作成など、インタラクティブなWebページを作成するために使用されます。
Streamlit-chat:Streamlitを拡張してチャットボットをより簡単に構築できるようにするライブラリです。メッセージの送受信、会話の状態の管理をおこなう関数を提供します。
Transformers:自然言語処理(NLP)タスクに人気アーキテクチャであるTransformerアーキテクチャの実装を提供するライブラリです。
PIL (Python Imaging Library) :Pythonで画像処理機能を提供するライブラリです。
Torch:Pythonの深層学習ライブラリです。
DeepFace:Pythonで顔認識機能を提供するライブラリです。
cv2 (OpenCV) :Pythonでコンピュータービジョン機能を提供するライブラリです。
2.OpenAI APIキー入力と画像ファイルアップロード
以下のコードでユーザーにOpenAI APIキーの入力を求め、チャットボットの元となる画像ファイルのアップロードを実施できるようにします。
```Python
user_api_key = st.sidebar.text_input(
   label="OpenAI API key",
   placeholder="Paste your openAI API key here",
   type="password")
   uploaded_file = st.sidebar.file_uploader("upload", type=['png', 'jpg'])
   os.environ['OPENAI_API_KEY'] = user_api_key
 ```
3.画像分析AIに必要な要素を定義
顔、年齢、および性別を画像から分析できるようにするために、以下のようにOpenCVのモデルを使用します。モデルの初期化は以下のように実施します。
Python
faceProto = "AgeGender/opencv_face_detector.pbtxt"
faceModel = "AgeGender/opencv_face_detector_uint8.pb"
ageProto = "AgeGender/age_deploy.prototxt"
ageModel = "AgeGender/age_net.caffemodel"
genderProto = "AgeGender/gender_deploy.prototxt"
genderModel = "AgeGender/gender_net.caffemodel"

ageNet = cv.dnn.readNet(ageModel, ageProto)
genderNet = cv.dnn.readNet(genderModel, genderProto)
faceNet = cv.dnn.readNet(faceModel, faceProto)

MODEL_MEAN_VALUES = (78.4263377603, 87.7689143744, 114.895847746)
生成された年齢や性別データは、以下のようにカテゴライズして年齢の範囲と性別の分類がおこなわれるように初期化します。
Python
ageList = ['(0-2)', '(4-6)', '(8-12)', '(15-20)', '(25-32)', '(34-39)', '(48-53)', '(60-100)']
genderList = ['Male', 'Female']
4.カスタムツールの定義
オブジェクト検出するためのカスタムツール関数を定義します。各カスタムツールにはnameとdescriptionに対してツール名と説明文をオーバーライドしてください。
以下のコードは画像キャプションツールのコードです。このAIツールは画像内容を出力できます。
Python
class ImageCaptionTool(BaseTool):
    name = "Image captioner"
    description = "Use this tool when given the path to an image that you would like to be described. " \
                "It will return a simple caption describing the image."

    def _run(self, img_path):
        image = Image.open(img_path).convert('RGB')

        model_name = "Salesforce/blip-image-captioning-large"
        device = "cpu"  # cuda

        processor = BlipProcessor.from_pretrained(model_name)
        model = BlipForConditionalGeneration.from_pretrained(model_name).to(device)

        inputs = processor(image, return_tensors='pt').to(device)
        output = model.generate(**inputs, max_new_tokens=4000)

        caption = processor.decode(output[0], skip_special_tokens=True)

        return caption

    def _arun(self, query: str):
        raise NotImplementedError("This tool does not support async")
以下に物体検出ツールを定義します。このツールは物体の数を検知できます。
Python
class ObjectDetectionTool(BaseTool):
    name = "Object detector"
    description = "Use this tool when given the path to an image that you would like to detect objects. " \
                "It will return a list of all detected objects. Each element in the list in the format: " \
                "[x1, y1, x2, y2] class_name confidence_score."

    def _run(self, img_path):
        image = Image.open(img_path).convert('RGB')

        processor = DetrImageProcessor.from_pretrained("facebook/detr-resnet-50")
        model = DetrForObjectDetection.from_pretrained("facebook/detr-resnet-50")

        inputs = processor(images=image, return_tensors="pt")
        outputs = model(**inputs)

        # convert outputs (bounding boxes and class logits) to COCO API
        # let's only keep detections with score > 0.9
        target_sizes = torch.tensor([image.size[::-1]])
        results = processor.post_process_object_detection(outputs, target_sizes=target_sizes, threshold=0.9)[0]

        detections = ""
        for score, label, box in zip(results["scores"], results["labels"], results["boxes"]):
            detections += '[{}, {}, {}, {}]'.format(int(box[0]), int(box[1]), int(box[2]), int(box[3]))
            detections += ' {}'.format(model.config.id2label[int(label)])
            detections += ' {}\n'.format(float(score))

        return detections

    def _arun(self, query: str):
        raise NotImplementedError("This tool does not support async")
以下に感情検出ツールを定義します。これにより画像の感情を出力できます。
Python
class EmotionDetectionTool(BaseTool):
    name = "Emotion detector"
    description = "Use this tool when given the path to an image that you would like to detect emotion. "

    def _run(self, img_path):

        detections = DeepFace.analyze(img_path)

        return detections

    def _arun(self, query: str):
        raise NotImplementedError("This tool does not support async")
以下に年齢と性別検出ツールを定義します。これにより画像から年齢と性別の人数を分析できます。
Python
class GenderAgeDetectionTool(BaseTool):

    name = "Gender and age detector"
    description = "Use this tool when given the path to an image that you would like to detect Gender and Age. "

    def _run(self, img_path):

        def getFaceBox(net, frame, conf_threshold=0.7):
            frameOpencvDnn = frame.copy()
            frameHeight = frameOpencvDnn.shape[0]
            frameWidth = frameOpencvDnn.shape[1]
            blob = cv.dnn.blobFromImage(frameOpencvDnn, 1.0, (300, 300), [104, 117, 123], True, False)
            net.setInput(blob)
            detections = net.forward()
            bboxes = []
            for i in range(detections.shape[2]):
                confidence = detections[0, 0, i, 2]
                if confidence > conf_threshold:
                    x1 = int(detections[0, 0, i, 3] * frameWidth)
                    y1 = int(detections[0, 0, i, 4] * frameHeight)
                    x2 = int(detections[0, 0, i, 5] * frameWidth)
                    y2 = int(detections[0, 0, i, 6] * frameHeight)
                    bboxes.append([x1, y1, x2, y2])
                    cv.rectangle(frameOpencvDnn, (x1, y1), (x2, y2), (0, 255, 0), int(round(frameHeight/150)), 8)
            return frameOpencvDnn, bboxes

        padding = 20

        t = time.time()
        frame = cv.imread(img_path)
        frameFace, bboxes = getFaceBox(faceNet, frame)
        for bbox in bboxes:
            # print(bbox)
            face = frame[max(0,bbox[1]-padding):min(bbox[3]+padding,frame.shape[0]-1),max(0,bbox[0]-padding):min(bbox[2]+padding, frame.shape[1]-1)]
            blob = cv.dnn.blobFromImage(face, 1.0, (227, 227), MODEL_MEAN_VALUES, swapRB=False)
            genderNet.setInput(blob)
            genderPreds = genderNet.forward()
            gender = genderList[genderPreds[0].argmax()]
            # print("Gender Output : {}".format(genderPreds))
            print("Gender : {}, conf = {:.3f}".format(gender, genderPreds[0].max()))
            ageNet.setInput(blob)
            agePreds = ageNet.forward()
            age = ageList[agePreds[0].argmax()]
            print("Age Output : {}".format(agePreds))
            print("Age : {}, conf = {:.3f}".format(age, agePreds[0].max()))
            label = "{},{}".format(gender, age)
            # cv.putText(frameFace, label, (bbox[0], bbox[1]-10), cv.FONT_HERSHEY_SIMPLEX, 0.8, (0, 255, 255), 2, cv.LINE_AA)
            return {"Gender":gender, "Age":age}

    def _arun(self, query: str):
        raise NotImplementedError("This tool does not support async")
5.Langchainエージェントとチャットボットの導入
tools = [ImageCaptionTool(), ObjectDetectionTool(), EmotionDetectionTool(), GenderAgeDetectionTool()]
このコードにより、エージェントチェーンが使用するツールのリストを定義します。ツールのリストには、画像キャプションツール、物体検出ツール、感情検出ツール、および性別年齢検出ツールが含まれています。これらのツールはエージェントによって使用されますが、入力されたプロンプトにもとづいてどのツールがより有用であるか判定されます。
agent_chain = initialize_agent(
        agent="chat-conversational-react-description",
        tools=tools,
        llm=llm,
        max_iterations=5,
        verbose=True,
        memory=conversational_memory,
        early_stopping_method='generate'
    )
このコードをチャットボットに組み込むために、conversational_chat()関数内でagent_chainをagent_chain.run(f'{query}, this is the image path: {tmp_file_path}’)として実装しましょう。
Python
if uploaded_file :
    with tempfile.NamedTemporaryFile(delete=False) as tmp_file:
        tmp_file.write(uploaded_file.getvalue())
        tmp_file_path = tmp_file.name

    #initialize the agent
    tools = [ImageCaptionTool(), ObjectDetectionTool(), EmotionDetectionTool(), GenderAgeDetectionTool()]

    llm = ChatOpenAI(temperature=0.0,model_name='gpt-3.5-turbo')

    conversational_memory = ConversationBufferWindowMemory(
        memory_key='chat_history',
        k=5,
        return_messages=True
    )

    agent_chain = initialize_agent(
        agent="chat-conversational-react-description",
        tools=tools,
        llm=llm,
        max_iterations=5,
        verbose=True,
        memory=conversational_memory,
        early_stopping_method='generate'
    )

    # chain = ConversationalRetrievalChain.from_llm(llm = ChatOpenAI(temperature=0.0,model_name='gpt-3.5-turbo-16k'),
    #                                                                   retriever=vectors.as_retriever())

    def conversational_chat(query):

        result = agent_chain.run(f'{query}, this is the image path: {tmp_file_path}')
        st.session_state['history'].append((query, result))

        return result

    if 'history' not in st.session_state:
        st.session_state['history'] = []

    if 'generated' not in st.session_state:
        st.session_state['generated'] = ["Hello ! Feel free to ask about anything regarding this" + uploaded_file.name]

    if 'past' not in st.session_state:
        st.session_state['past'] = ["Hey !"]

    response_container = st.container()
    container = st.container()

    with container:
        with st.form(key='my_form', clear_on_submit=True):

            user_input = st.text_input("Query:", placeholder="Talk about your pdf data here (:", key='input')
            submit_button = st.form_submit_button(label='Send')

        if submit_button and user_input:
            output = conversational_chat(user_input)

            st.session_state['past'].append(user_input)
            st.session_state['generated'].append(output)

    if st.session_state['generated']:
        with response_container:
            for i in range(len(st.session_state['generated'])):
                message(st.session_state["past"][i], is_user=True, key=str(i) + '_user', avatar_style="big-smile")
                message(st.session_state["generated"][i], key=str(i), avatar_style="thumbs")
6.チャットアプリケーションの実行
以下のコマンド実行することでチャットアプリケーションを実行が可能になります。
Terminal
streamlit run name_of_your_chatbot.py
※作成した実際のファイル名で、’name_of_your_chatbot.py’ を置き換えてください。
7.結果
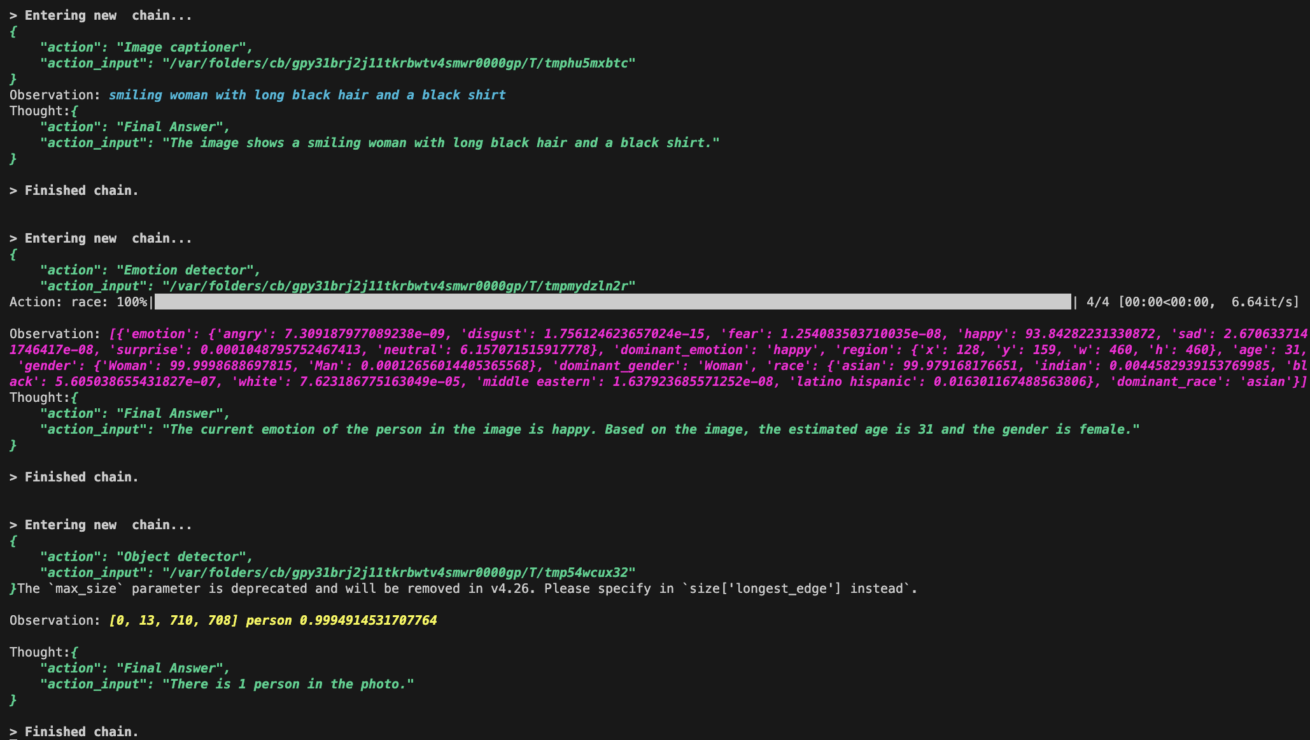
画像をアップロードして、その画像について質問をしてみました。こちらは実際の実行結果です。
アップロード画像:

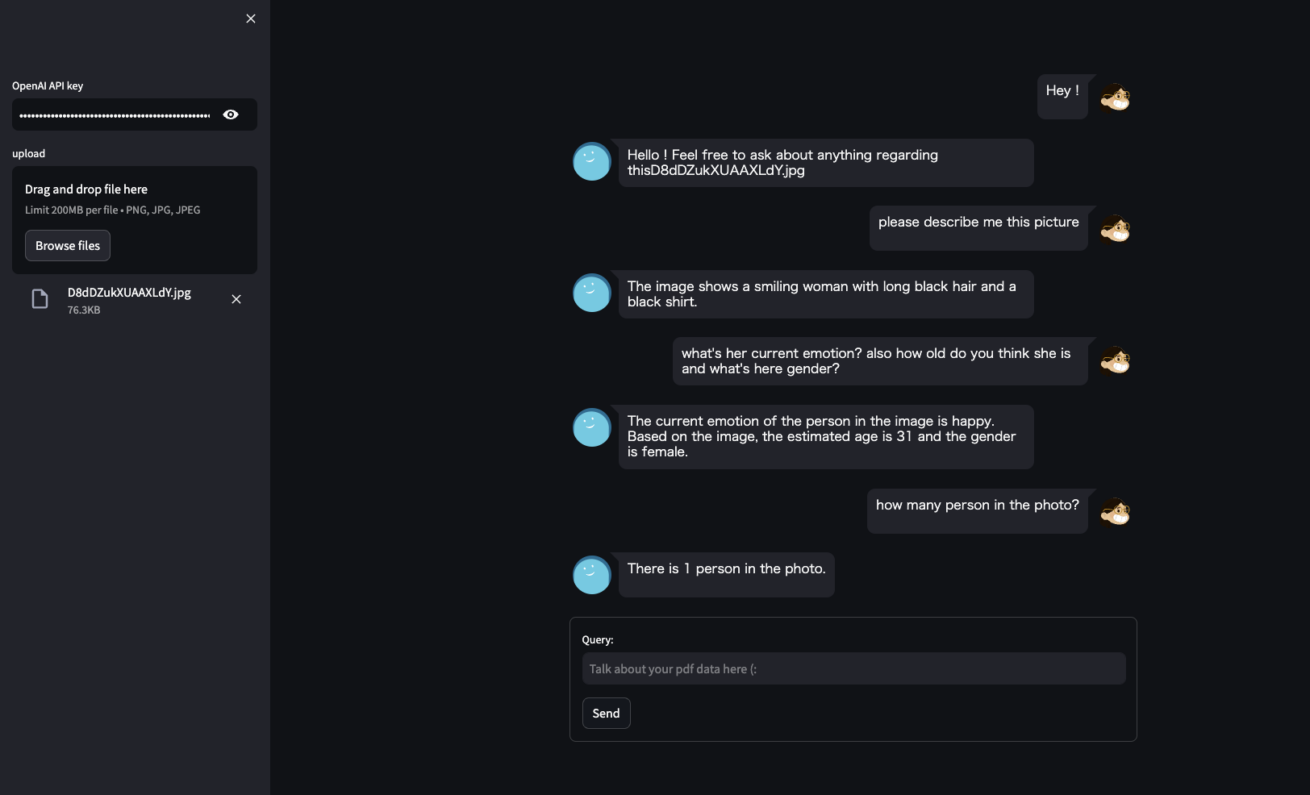
以下がプログラム実行結果ログです。それぞれどのような出力結果となっているかを確認することができます。
まとめ
LangChain Toolは独自のモデルを設定することが可能です。そしてLangChain Agentは、プロンプトの内容に応じて適切なツールを選択し、モデル利用することができます。これにより、インタラクティブなチャットボットアプリケーションが実現します。
今回は画像分析チャットアプリケーション開発を通じてエージェントの使い方を解説しましたが、エージェントやツールの使い方はさまざまです。ぜひいろいろと試してみてください。
また、LIGでは生成AIコンサルティング事業をおこなっています。ぜひ気軽にご相談ください。
最新情報をメルマガでお届けします!
LIGブログではAIやアプリ・システム開発など、テクノロジーに関するお役立ち記事をお届けするメルマガを配信しています。
- <お届けするテーマ>
-
- 開発プロジェクトを円滑に進めるためのTIPS
- エンジニアの生産性が上がった取り組み事例
- 現場メンバーが生成AIを使ってみた
- 開発ツールの使い方や開発事例の解説
- AIをテーマにしたセミナーの案内
- 最新のAI関連ニュースまとめ など
「AIに関する最新情報を集めたい!」「開発ツールの解説や現場の取り組みを知りたい!」とお考えの方は、ぜひお気軽に無料のメルマガをご購読くださいませ。
